
🆕 What's new in version 1.2.0.0
- Shared mailboxes and shared folders: The add-in supports them.
- Updated branding: The add-in uses Open Point branding.
Prerequisites
The Open Point Outlook Add-In is available on both web and desktop versions of Outlook. In this article we will cover how to install the Outlook Add-In. Please check the following Outlook and Exchange requirements for compatibility with the Open Point Outlook add-in:
- Outlook Desktop for Windows (Microsoft 365)
- Outlook Desktop for Mac (Microsoft 365)
- Outlook Web
- Shared folders and shared mailboxes (supported from add-in version 1.2.0.0)
Unsupported Versions:
- Outlook 2013 and earlier
- Outlook 2016
- On-premise Exchange deployments, including Exchange 2016 and earlier
Note:
- The Open Point Add-in does not support versions of Outlook outside Microsoft 365, or on-premises deployments. In these cases, we recommend following How to use Inbound Email instead.
- An active Open Point license and a user account with Contributor access or higher are required to use this add-in.
Installing the Outlook Add-In
The installation process will vary depending on where you are installing directly through the Desktop version of Outlook or via Outlook web.
Installing through Outlook Desktop for Windows & Mac (Microsoft 365)
-
Open Outlook via the Desktop App
Open your apps and navigate to your Outlook Desktop app in either Windows or Mac. -
Access the Add-In Marketplace
Click on the App Icon in the bottom left of the side navigation bar or from the top right, the App Icon may be hidden in the three-dot menu. Then, from the menu, select "Add apps" and then navigate to the Add-Ins section. In Outlook for Windows, you can also select More apps in the Add-ins group of the ribbon, then select Add apps.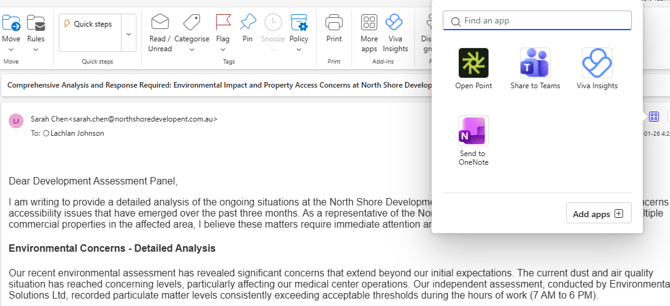
-
Search for the Add-In
In the Add-In Marketplace, use the search bar and search for “Open Point”, once located, click on the add-in to view its details. -
Install the Add-In
Finally, select the "Add" button and follow any on-screen instructions to complete the installation. Once installed the Add-in will be available for both the Desktop and Web versions of Outlook.
Note: The option to access the in-app marketplace may be disabled by your IT/Microsoft 365 Administrators, as a result if the option to access the Add-in Marketplace is not appearing within your Outlook Desktop you may need to submit a request to have the Open Point add-in added via your IT team.
Installing through Outlook Web
- Log in to Outlook Web
Open your internet browser and navigate to your Outlook Web account. - Access the Add-In Marketplace
Click on the App Icon in the bottom left of the side navigation bar or from the top right, the App Icon may be hidden in the three-dot menu. Then, from the menu, select "Add apps" and then navigate to the Add-Ins section. - Search for the Add-In
In the Add-In Marketplace, use the search bar and search for “Open Point”, once located, click on the add-in to view its details. - Install the Add-In
Finally, select the "Add" button and follow any on-screen instructions to complete the installation. Once installed the Add-in will be available for both the Desktop and Web versions of Outlook.
Next Steps
Once you have successfully installed the Add-in check out our How to use the Open Point Outlook Add-In guide which covers login and how to send emails into Open Point via the Add-in.