Required Role: Enterprise Admin
The SP x OP Connector integrates Social Point (SP) and Open Point (OP). When someone submits feedback on Social Point, Open Point creates an event for the submission on the linked project and connects it to a stakeholder profile. You get one continuous record of each person's engagement without re-entering data.
Social Point remains the home of the full submission. Open Point holds the answers you choose to map, plus a link back to the original response.
Availability: The connector is currently available to selected customers. Contact your Customer Success Manager (CSM) to ask about access for your site.
Warning: If you already use the current SP x OP connector that was set up in Social Point, it won't work at the same time as the new connector.
How it works
When someone submits a response in Social Point, Open Point adds it to your linked project as an event. Each event shows the answers you've chosen to map ,with a link back to the original submission.
Your Social Point records are never altered. Information flows one way, from Social Point to Open Point, so the original submission always stays as it was received. New submissions usually appear within moments, so your team can see and act on feedback as it comes in.
The connector handles three things:
- Members to stakeholders: Open Point creates a stakeholder profile from a Social Point member.
- Submissions to events: Each submission to a linked tool creates an event on the linked Open Point project.
- Project linking: You link one or more Social Point projects to an Open Point project.
What An Event Holds
An event holds the project, the tool type and name, the date and time, the connected stakeholder, and a link back to the submission in Social Point. You can also map fields from a Social Point tool, such as a survey, into event fields. The full response stays in Social Point, which remains the source of truth.
How Stakeholder Profiles Are Created
Open Point can create a stakeholder profile in three ways:
- A member registers in Social Point. Open Point creates a stakeholder profile for them.
- A logged-in member submits a tool. Open Point creates a stakeholder profile and connects it to that submission.
- Someone who isn't logged in submits a tool that asks for an email address. Open Point uses the email address from the email field to create the stakeholder profile.
Before it creates a profile, Open Point checks for an existing stakeholder with the same email address. If it finds one, it connects the event to that profile and doesn't overwrite its data. It doesn't create a duplicate. New profiles created by the connector show Social Point Integration as the source in the audit history, so they're easy to find.
What The Integration Creates In Open Point
| Action in Social Point | Creates in Open Point |
| A submission to a tool that is turned on | An event on the linked project, with the mapped answers and a link back to the submission |
| A submission with an email address that matches a stakeholder profile | The event created is connected to that stakeholder profile |
| A submission with an email address that doesn't match a stakeholder profile | A new stakeholder profile, marked as coming from Social Point, connected to the event |
| A submission with a blank email address | Not connected. Nothing is created |
| A member registers | A new stakeholder profile |
| An update to a Social Point member | Empty fields on the matching stakeholder profile are filled in. Existing values aren't changed |
Move Between The Two Products
Deep links connect related records, so you can jump between them:
- An Open Point project to its linked Social Point project
- An Open Point event to the Social Point submission it came from, using the View in Social Point button
- An Open Point stakeholder profile to its corresponding Social Point member profile.
Links open in a new tab. You need to be signed in to Social Point to use them, and each product's own permissions apply. A person without access to the Social Point submission can't view it by following the link. If the target record no longer exists in Social Point, for example because a submission was deleted, an amber warning appears on the Open Point record.
Note: There's no single sign-on between the two products, so people need an account in both SP and OP.
Before You Start
Make sure you have the following:
- A Social Point site and an Open Point site
- An Enterprise Admin Access in Open Point to map stakeholder fields
- A Team Leader Permission access on each Open Point project you want to link (see SPxOP Connector: Linking Projects and Mapping Tools)
- A Client ID and Client Secret, which you can request from the Support team once the integration is turned on
- Your Social Point site URL and the API URL for your region (used to authenticate with Social Point):
| Region | API URL |
| Australia and New Zealand | api.au.harvestdp.com |
| United States | api.us.harvestdp.com |
| Canada | api.ca.harvestdp.com |
| Europe | api.eu.harvestdp.com |
Set up the connector
1. Turn On The Connector
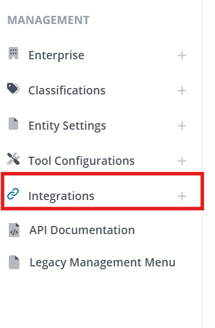
The connector needs to be turned on for both your Open Point and Social Point sites. Your CSM can arrange this or you can request it with the Support team. After it's turned on, An Integrations option appears in the Settings menu.
2. Enter Connection Details
Enter the details that connect your Open Point site to your Social Point site. Before you start, make sure you have:
- Site URL: The URL of your Social Point site.
- API URL: The URL used to authenticate with Social Point. Use the address for your region from the table above.
- Client ID: Request this from the Support team.
- Client Secret: Request this from the Support team.
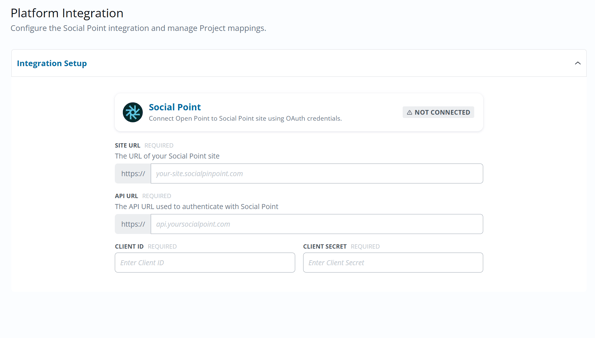
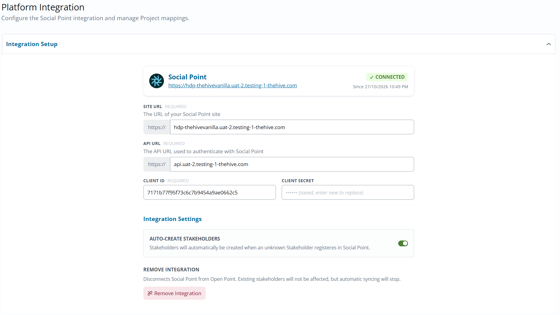
- Select the Settings icon, then Integrations, then Social Point Connector. The Platform Integration page opens with the Integration Setup section.
- Enter your Site URL, API URL, Client ID, and Client Secret. The https:// is already filled in for both URLs, so enter the rest.
- Save your details.
If a detail is wrong, Open Point shows an error. 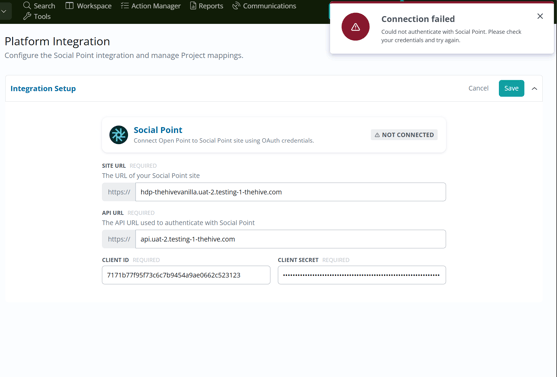
If they're all correct, the Social Point card shows Connected with the date and time and the additional Integration settings
Please note:
-
The Stakeholder Mapping, Project Overview, and Connector Errors sections only appear once your connection is set up successfully.
-
After you save it, the Client Secret isn't shown again. The field shows that it's saved. To change it, enter a new secret in the same field.
3. Choose your Integration settings
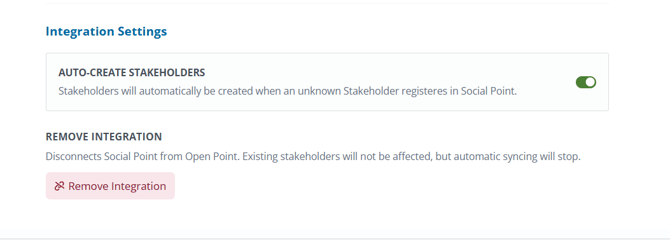
Below your connection details, the Integration Settings section has two options:
- Auto-create stakeholders: Turn this on during setup if you want Open Point to create stakeholder profiles automatically when an unknown
- Remove Integration: Select this to disconnect Social Point from Open Point. Existing stakeholder profiles aren't affected, but automatic syncing stops. After you disconnect, refresh the page before you reconnect.
4. Map Stakeholder Fields
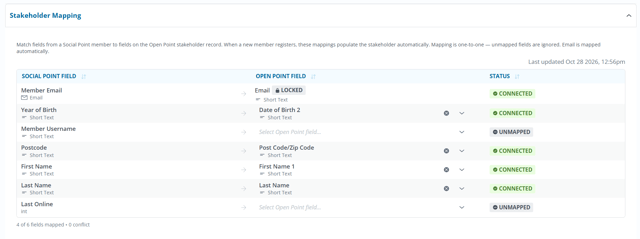
Use the Stakeholder Mapping section to match fields from a Social Point member to fields on the Open Point stakeholder profile. When a new member registers, these mappings fill in the stakeholder profile automatically. Open Point also uses them when it creates or updates stakeholder profiles after someone submits a feedback in Social Point.
- Email: Email is mapped automatically and locked. Open Point uses the email address to decide whether a Social Point member is represented as a stakeholder profile.
- Matching fields: For each Social Point field you want to use, choose an Open Point field from the list. Each Social Point field maps to one Open Point field.
- Status: Each field shows Connected or Unmapped. Unmapped fields are ignored.
- Summary: A count below the table shows how many fields are mapped and how many conflicts there are. The upper right section also shows when the mapping was last updated.
An Enterprise Admin can update the stakeholder mapping at any time.
When your stakeholder mapping is done, the next step is to link your projects. See SPxOP Connector: Linking Projects and Mapping Tools
5. Review Linked Projects (Project Overview)
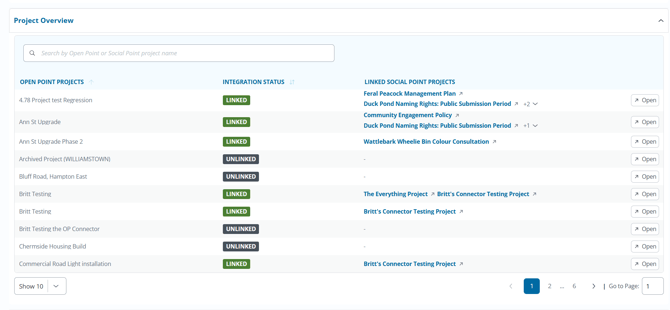
The Project Overview section lists all your Open Point projects and the Social Point projects linked to each one. Use it to audit your setup. After you've linked your projects, check that nothing is linked in the wrong place and that nothing has been missed.
- Integration status: Each project shows Linked or Unlinked.
- Linked Social Point projects: Each Open Point project shows the Social Point projects linked to it. If more than a few are linked, the list shows how many others are not displayed.
- Search: Use the search box to find a project by its Open Point or Social Point name.
- Open: Select Open beside a project to view it in Open Point.
- Page Controls: Use the page controls to move through your projects, and choose how many records to show on each page.
6. Check Connector Errors
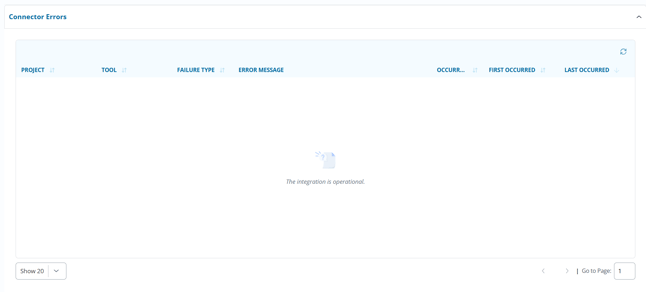
The Connector Errors section lists problems with the connector, to help with diagnostics. At the moment, it only shows errors caused by changes to field mapping.
For example, if you rename or delete an Open Point field that you've mapped, such as First Name, that field stops mapping correctly and an error appears.
If you need more help, contact the Support team.